Difference between revisions of "Backpack"
(→Removing Unnecessary Straps) |
(→Fixing the Shoulder Straps) |
||
| (4 intermediate revisions by the same user not shown) | |||
| Line 29: | Line 29: | ||
==Fixing the Shoulder Straps== | ==Fixing the Shoulder Straps== | ||
| + | [[File:D-rings.jpg]] | ||
| + | |||
These are probably the worst thing about these cheap bags, because the straps keep pulling out of the D-rings the top: | These are probably the worst thing about these cheap bags, because the straps keep pulling out of the D-rings the top: | ||
| − | [[File: | + | [[File:Remove-shoulder-straps.jpg]] |
| − | ...and the bottoms are far more complicated than they need to be, with a D-ring | + | ...and the bottoms are far more complicated than they need to be, with a D-ring and tri-glide at the bottom to change the length, and then a buckle in the middle where the length can also be changed. |
| − | + | With the bottom end already removed from the bag, I cut the seams or stitching shown by red lines here (dashed lines where it's hidden behind something). | |
| − | (I could have put ladder locks at the top of the shoulder-straps, but didn't want to remove and then replace all | + | [[File:Dog-hook.jpg]] |
| + | |||
| + | Fitted dog-hooks in the middle of the shoulder strap, while the bottom end was free to thread them on. | ||
| + | |||
| + | [[File:Bottom-of-shoulder-straps.jpg]] | ||
| + | |||
| + | Then I undid everything so that one end of the long piece of webbing, and the triangular reinforcing piece could be sewn back in place like this, with the ladder lock I removed from the side compression-strap replacing the buckles (this much simpler method is the one used on my 65 liter rucksack). | ||
| + | |||
| + | [[File:Top-of-shoulder-straps.jpg]] | ||
| + | |||
| + | At the top I took the webbing out of the D-rings, threaded the strap up through a tri-glide (the one I removed from the bottom end of the shoulder-strap) then the rings, and then back down through the tri-glide. The double thickness of webbing holds solidly in the tri-glide (I could have put ladder locks at the top of the shoulder-straps, but didn't want to remove and then replace all of that stitching, so kept the D-rings). | ||
==What's inside== | ==What's inside== | ||
| − | + | [[File:Turnigy-case.jpg]] | |
| + | |||
| + | In the main section the bigger version of the Turnigy transmitter + goggles case (320x220x110mm). | ||
| + | |||
| + | [[File:Middle-section.jpg]] | ||
| + | |||
| + | In the middle section, batteries, tools and charging gear. | ||
| + | |||
| + | [[File:Front-pockets.jpg]] | ||
| + | |||
| + | In the front pockets, spare props, and spare parts. | ||
| + | |||
| + | [[File:On-the-outside.jpg]] | ||
| + | |||
| + | An Armattan Chameleon, DYS Elf, and Alite Mayfly folding chair, and a 10m roach pole. | ||
Latest revision as of 02:11, 13 September 2017
I bought one of the cheap backpacks recommended by Stew from UAVFUTURES, for carrying FPV Multi-rotor gear.
However, as I own a sewing machine and a box full of spare rucksack fittings, I figured I could make some improvements.
(There are a whole load of different Ebay sellers, selling bags from several different manufacturers. As there are slight differences between manufacturers, you may not end up with one exactly like this.)
Contents
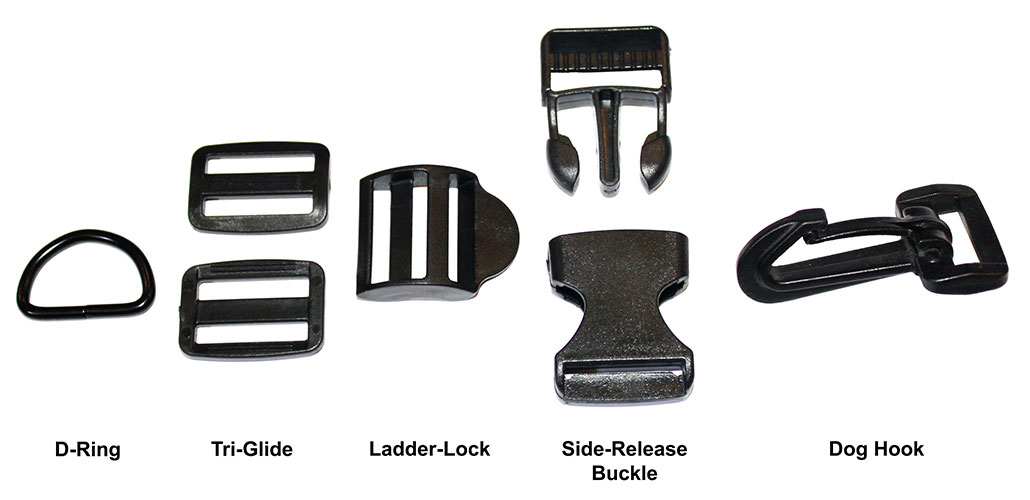
What All the Plastic Bits are Called
In case you need to buy extras (add 'webbing' to your search, to avoid getting lots of other stuff):
Removing Unnecessary Straps
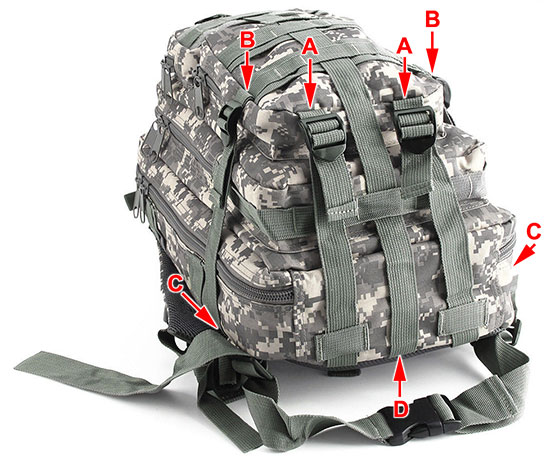
The bag has a lot of compression straps to squash it down when it's not full, and stop things rattling about inside. Seeing as it is going to be completely filled, I decided to remove most of these, along with the waist and chest straps, because I'm not planning on hiking long distances, or carrying a lot of weight that needs to be firmly attached to me.
Doing this gets rid of extra straps that get in the way when you just want to open the bag, or get tangled up in things when moving it around. It also provides some webbing and fittings that can be re-purposed to tailor the bag more to FPV use.
- Remove straps at A, B and D and stitch the seams back up again. Undo the two arms of the Y-shaped top of the strap you removed at D.
- Open the seams at C to remove the side compression-straps, and the waist strap, and the triangular pieces where the bottoms of the shoulder-straps are attached. Leave these seams open for now. If you have sewing pins you can use them to stop the seams from opening up further as you work on the rest of the bag.
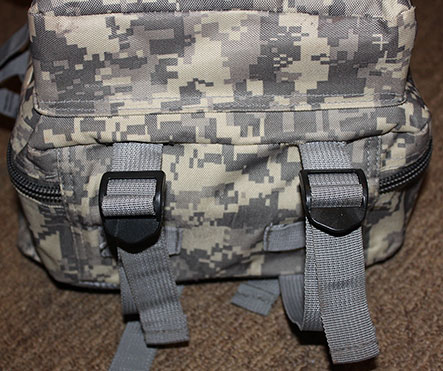
Take the straps that attached at A, and unthread the now free ends, so that you can pass them through the short lengths of webbing sewn to the bottom of the bag. Open up the seam shown above, and reassemble/reattach the straps there (this allows us to strap something securely to the bottom of the bag, without compressing or forcing the whole of the bottom inward).
Fixing the Shoulder Straps
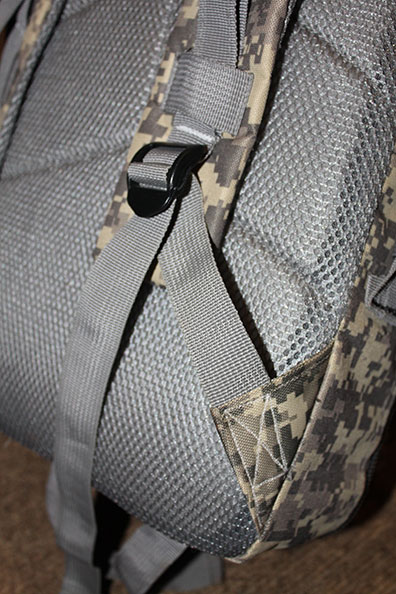
These are probably the worst thing about these cheap bags, because the straps keep pulling out of the D-rings the top:
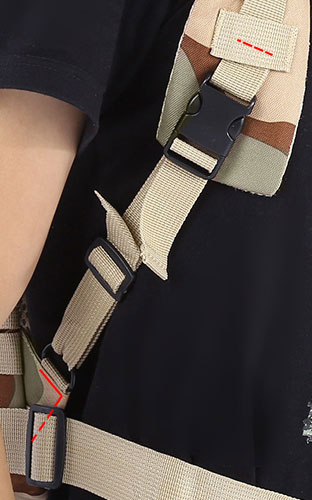
...and the bottoms are far more complicated than they need to be, with a D-ring and tri-glide at the bottom to change the length, and then a buckle in the middle where the length can also be changed.
With the bottom end already removed from the bag, I cut the seams or stitching shown by red lines here (dashed lines where it's hidden behind something).
Fitted dog-hooks in the middle of the shoulder strap, while the bottom end was free to thread them on.
Then I undid everything so that one end of the long piece of webbing, and the triangular reinforcing piece could be sewn back in place like this, with the ladder lock I removed from the side compression-strap replacing the buckles (this much simpler method is the one used on my 65 liter rucksack).
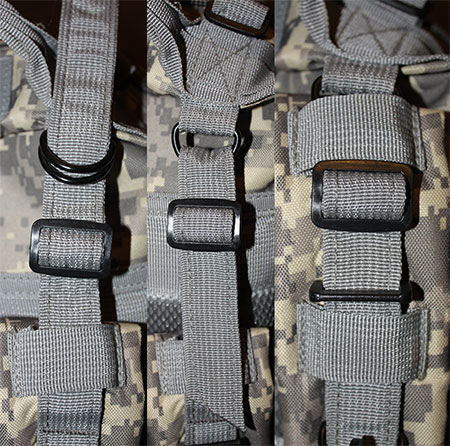
At the top I took the webbing out of the D-rings, threaded the strap up through a tri-glide (the one I removed from the bottom end of the shoulder-strap) then the rings, and then back down through the tri-glide. The double thickness of webbing holds solidly in the tri-glide (I could have put ladder locks at the top of the shoulder-straps, but didn't want to remove and then replace all of that stitching, so kept the D-rings).
What's inside
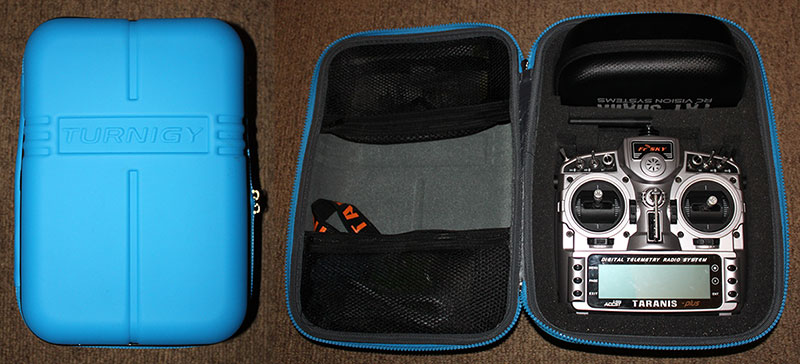
In the main section the bigger version of the Turnigy transmitter + goggles case (320x220x110mm).
In the middle section, batteries, tools and charging gear.
In the front pockets, spare props, and spare parts.
An Armattan Chameleon, DYS Elf, and Alite Mayfly folding chair, and a 10m roach pole.
